- All
- Product Name
- Product Keyword
- Product Model
- Product Summary
- Product Description
- Multi Field Search


Views: 0 Author: Site Editor Publish Time: 2026-09-27 Origin: Site


Few things ruin a woodworking project faster than ugly, scorched edges on a fresh cut. You spend hours selecting the perfect boards. You plane them flat and joint the edges perfectly. Then, disaster strikes at the saw. A circular saw blade burning wood creates immense operational frustration. It forces you to spend hours sanding away hard scorch marks. More importantly, it wastes highly valuable materials.
Scorched edges rarely happen randomly. They serve as a highly measurable symptom of excessive friction. Equipment mismatch, poor maintenance routines, or fundamental technique errors usually cause this excess heat. We must stop guessing and start systematically diagnosing the issue.
This guide provides a straightforward diagnostic framework. We will help you quickly isolate the true root cause of wood burns. You will learn how to evaluate your tools properly. By the end, you will know exactly if you need a thorough cleaning, a machine recalibration, or a brand new blade to restore clean cuts.
Friction is the enemy: Burn marks occur when the blade rubs rather than cuts, heating the wood's lignin until it scorches.
Clean before replacing: Pitch and resin buildup on TCT (Tungsten Carbide Tipped) teeth mimic the symptoms of a dull blade.
Geometry matters: Using the wrong TCT saw blade tooth count—such as a high-tooth crosscut blade for ripping—traps sawdust and generates extreme heat.
Alignment is critical: A misaligned fence or track guide will cause the back of the blade to bind and burn the material.
Actionable resolution: Most burning issues can be resolved by matching blade specifications to the material and maintaining an optimal feed rate.
We must first define the physical mechanics of wood burn. Saws are fundamentally designed to shear material and quickly clear the resulting chips. When a blade efficiently slices through timber, it leaves behind a beautifully clean edge. However, if chip clearance fails, heavy friction immediately takes over.
This friction rapidly heats the natural lignin inside the wood cells. Lignin acts as the structural glue holding wood fibers together. Once temperatures rise high enough, this lignin bakes and scorches. It leaves behind those stubborn, dark brown burn marks along your cutline.
Material variables play a massive role here. Different wood species react entirely differently to heat. Dense, high-sugar hardwoods are highly susceptible to burning. Cherry, maple, and walnut scorch much faster than common softwoods like pine or cedar. You must deliberately adjust your approach when cutting these challenging materials.
A perfectly clean cut relies on specific success criteria. First, you need incredibly sharp carbide tips to cleanly sever the wood fibers. Second, the blade requires adequate gullet capacity. Deep gullets scoop out sawdust before it compresses. Finally, you need a perfectly clear path through the kerf. Any lateral binding guarantees instant, severe friction.
Many woodworkers immediately assume their blade is dull at the first sign of burning. Usually, the real culprit is pitch buildup. Wood sap and resin bake onto the steel during normal use. Softwoods like pine are especially notorious for dumping sticky sap.
This residue collects heavily just below the carbide teeth. As it builds up, it severely reduces the clearance angle of the teeth. The blade then physically rubs against the wood instead of slicing it. This mimics a dull blade perfectly, but the actual cutting edges might still be sharp.
You should follow a strict inspection protocol before buying a replacement. Take the blade off your saw and examine it under bright light. Do you see a brown or black crusty residue caked on the teeth? If so, cleaning is your mandatory first step.
If your blade is completely clean but still burns, you must assess carbide wear. Look closely at the TCT edges. You can even use a small magnifying glass. Check for tiny micro-chipping along the cutting tips. Look for rounded corners where the carbide should feel razor sharp. You might even discover missing teeth.
Cleaning a blade is incredibly fast and cheap. It often completely restores peak performance. However, you cannot fix physical metal damage with solvents. Repeatedly cleaning a fundamentally dull or damaged blade will never restore your cut quality. You must replace physically damaged tools.
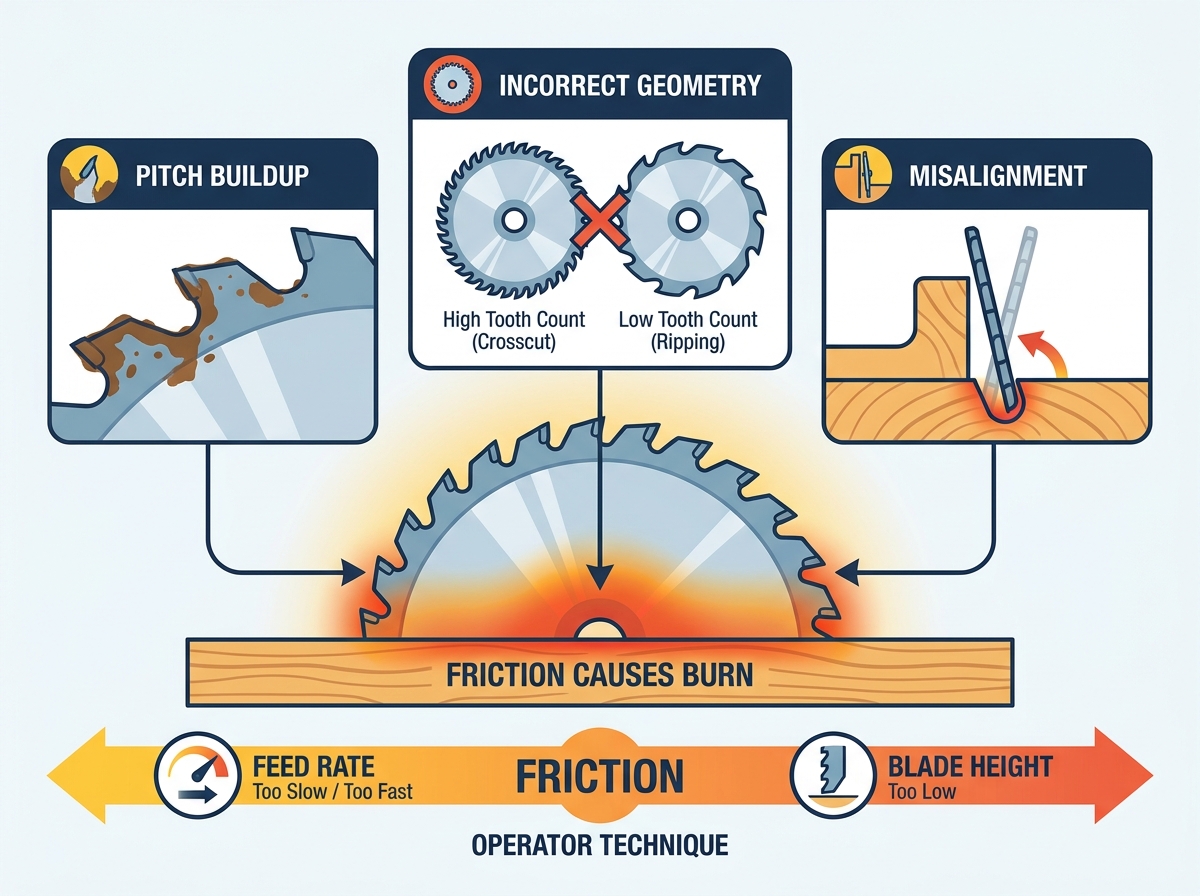
You must actively match your blade design to your specific cut. Using a universal blade for every single project often leads to heat buildup. To prevent scorching, you need to understand how blade geometry directly influences friction.
The most common beginner mistake involves confusing ripping and crosscutting applications. Ripping means cutting parallel to the wood grain. This process creates long, stringy wood shavings. Therefore, ripping requires a much lower TCT saw blade tooth count. A standard 24-tooth blade features massive, deep gullets. These gullets easily evacuate large chips before they compress and burn.
Conversely, using a high-tooth-count blade for ripping creates an immediate disaster. A 60-tooth or 80-tooth blade is meant purely for smooth crosscuts across the grain. It produces very fine dust. If you use it to rip a thick board, those tiny gullets instantly clog. The trapped sawdust compresses tightly against the wood, causing severe friction and instant burning.
Hook angle serves as another critical geometric factor. The hook angle dictates how aggressively the teeth enter the material. A positive hook angle pulls the wood inward toward the saw. It feeds aggressively and runs much cooler during long rip cuts. Meanwhile, a negative hook angle pushes material slightly away. It is much safer for delicate crosscuts or sliding miter saws. However, a negative hook generates significantly more friction if you force it too fast through thick hardwoods.
Blade Application Comparison Chart
Cut Direction | Ideal Tooth Count Range | Gullet Size | Primary Risk of Burning |
|---|---|---|---|
Ripping (With Grain) | 24T - 30T | Large / Deep | Using too many teeth; clogged gullets |
Crosscutting (Across Grain) | 60T - 80T | Small / Shallow | Pushing too slowly; lingering in the kerf |
Combination / General | 40T - 50T | Medium | Thick hardwoods overwhelming the blade body |
Your physical technique heavily dictates the final cut quality. Feed rate dynamics determine exactly how long the blade touches the wood. You must find the perfect balance. If you push the material too slowly, the teeth dwell in one spot. They spin against the same wood fibers repeatedly. This hesitation generates massive friction and leaves distinct burn rings.
On the other hand, if you push too fast, you overwhelm the gullets. The blade simply cannot clear chips quickly enough. The sawdust packs tightly, and you risk bogging down the entire motor. A smooth, continuous feed rate is crucial for clean edges.
Even with perfect feed rates, a misaligned machine ruins cuts. Fence and track calibration are absolutely vital. A table saw fence must sit perfectly parallel to the blade. Track saw guides need the exact same precision. If the fence angles slightly toward the back of the blade, "heeling" occurs. The ascending teeth at the rear furiously drag against the freshly cut edge. This binds the blade, scorches the wood, and creates a highly dangerous kickback hazard.
Blade height setting also drastically impacts heat generation. Many users mistakenly set the blade too low. They barely let the teeth peek over the top of the board. This forces the heavy steel blade body to travel horizontally through the wood. It severely reduces the exit angle of the teeth. Heat gets trapped inside the kerf. Instead, raise the blade higher. Let the bottom of the gullets just clear the top of your workpiece. This simple adjustment reduces metal friction and dramatically improves cooling.
We suggest following a simple decision framework when your cuts start burning. Do not immediately throw away a functional tool. You save money by correctly identifying the issue. Follow these three distinct steps:
Clean: Always use a dedicated resin remover first. Scrub away all pitch, sap, and carbon buildup using a soft brass brush.
Calibrate: Grab a precision square. Check your fence alignment perfectly parallel to the miter slot. Verify your blade height.
Evaluate: Ask yourself if the current blade specification actually matches your material and your intended cut direction.
If your blade fails the evaluation step, replacement becomes highly necessary. Proper TCT saw blade selection solves most chronic burning issues. You must shortlist a new blade based strictly on your primary application. Do you mostly cut thick, dense hardwoods? You need a specialized 24-tooth rip blade. Do you cut fragile melamine panels? You need an 80-tooth negative hook blade.
Upgrading your equipment offers a strong investment rationale. High-quality TCT blades feature advanced engineering designed specifically to manage heat. They utilize specialized anti-friction coatings like Teflon or Perma-Shield. These slick protective layers prevent resin buildup and glide through sticky wood effortlessly.
Furthermore, premium blades feature laser-cut expansion slots along the rim. These tiny squiggly lines actively absorb vibration. They dissipate heat as the metal expands during long cuts. This intelligent design actively prevents the steel body from warping under heavy loads.
Fixing scorched cuts always requires a methodical diagnostic approach. You must systematically isolate the variable rather than blindly guessing. Check blade cleanliness, verify tooth count, align your fence correctly, and practice a smooth feed rate. Preventing wood burns ultimately comes down to minimizing friction inside the kerf. Proper machine setup and strict adherence to blade-to-material matching guarantee excellent results.
Audit your current tool inventory and thoroughly clean any dirty blades today.
Perform necessary calibrations on your table saw fence and track guides to prevent heeling.
Keep your feed rate steady and consistent to prevent heat buildup inside the kerf.
Upgrade to high-quality, application-specific TCT blades for your most critical woodworking cuts.
A: If the blade is completely clean, you likely have a machine setup or hardware issue. The most common cause is a misaligned fence pushing wood into the back teeth. It could also stem from using an incorrect tooth count for your specific cut type. Finally, you might have physically dulled carbide tips that require professional sharpening or replacement.
A: No. While high tooth counts provide incredibly smooth crosscuts, they cause major problems elsewhere. They lack the necessary gullet space required to clear stringy chips when ripping. The sawdust quickly compresses tightly inside the kerf, generating extreme friction and burning the wood.
A: Yes. Hardwoods like cherry, maple, and walnut burn very easily due to their high density and natural extractives. They hold heat much longer than softwoods. Cutting them cleanly requires razor-sharp blades, highly consistent feed rates, and perfect machine alignment.
A: Yes, up to a degree. Setting the blade higher reduces the total amount of metal dragging through the kerf. Adjusting it so the bottom of the gullets just clears the top of the wood improves the exit angle. This allows for far better chip ejection and active blade cooling.