- All
- Product Name
- Product Keyword
- Product Model
- Product Summary
- Product Description
- Multi Field Search

Views: 0 Author: Site Editor Publish Time: 2026-10-06 Origin: Site


Few things ruin a metalworking project faster than a jammed tool. You squeeze the handles and expect a clean snap. Instead, you end up facing a stuck metal pin. Often, you get an ugly, deformed flange. This ruins your structural joint. Mechanical frustration almost always stems from a simple mismatch. Your tool setup must perfectly align to your hardware. Blind riveting relies heavily on precise mechanical clearances. The internal pulling mechanism must properly grip the inserted pin. When these components fail to align, joint integrity drops rapidly. Structural weakness becomes a major project risk. You simply cannot afford unpredictable results.
This guide serves as your definitive technical resource. We will explore how to select the exact right equipment for your project. You will learn the mechanics behind reliable fastening operations. We also cover practical steps to upgrade your setup. We detail troubleshooting methods for common mechanical failures. By the end, you will achieve consistent results on every pull. You will protect your materials from unnecessary damage.
Nosepieces are labeled by the rivet body diameter, but are engineered to precisely grip the corresponding mandrel diameter.
Using a nosepiece that is too large causes the tool jaws to slip or deform the rivet head; a size too small will simply not accept the mandrel.
Standard imperial sizes (3/32", 1/8", 5/32", 3/16") map directly to metric equivalents (2.4mm, 3.2mm, 4.0mm, 4.8mm) for cross-compatibility.
Investing in a professional hand riveter with tool-less, interchangeable nosepieces and multi-piece Cr-Mo jaws prevents long-term maintenance bottlenecks.
Let us break down the core mechanics. You need to understand how the hardware actually operates. Every fastening job requires absolute precision. A slight tolerance deviation causes massive operational headaches.
You must recognize the two primary components. They interact uniquely during the fastening process.
The Rivet Body: This tubular section expands outward. It forms the permanent connection between your materials.
The Mandrel: This nail-like pin sits entirely inside the body. It acts as the mechanical activation trigger.
Your tool pulls this pin to deform the body. Once deformed, the body securely locks the joint.
Your tool contains small internal jaws. These jaws bite into the inserted pin. You squeeze the handles to generate pulling force. This action pulls the pin firmly against the front anvil. The pin head then forces the tubular body to expand outward. Finally, the pin snaps off at a predetermined breakpoint. The remaining body creates a permanent, vibration-resistant hold.
Oversized front pieces cause immediate trouble. They allow the pin to wobble inside the chamber. This creates an asymmetric pulling force. Your tool jaws will likely slip during operation. You might damage the hardware flanges permanently. Worse, the pin might snap below the material surface. An uneven pull ruins the aesthetic finish. It also leaves the joint structurally compromised.
Undersized pieces introduce completely different roadblocks. You simply cannot insert the pin into the tool. If you force it, you risk permanent jamming. The pin can lodge tightly inside the jaw cylinder after snapping. You will then waste hours trying to extract it. A blocked cylinder stops your entire workflow. You must disassemble the tool completely to fix the blockage.
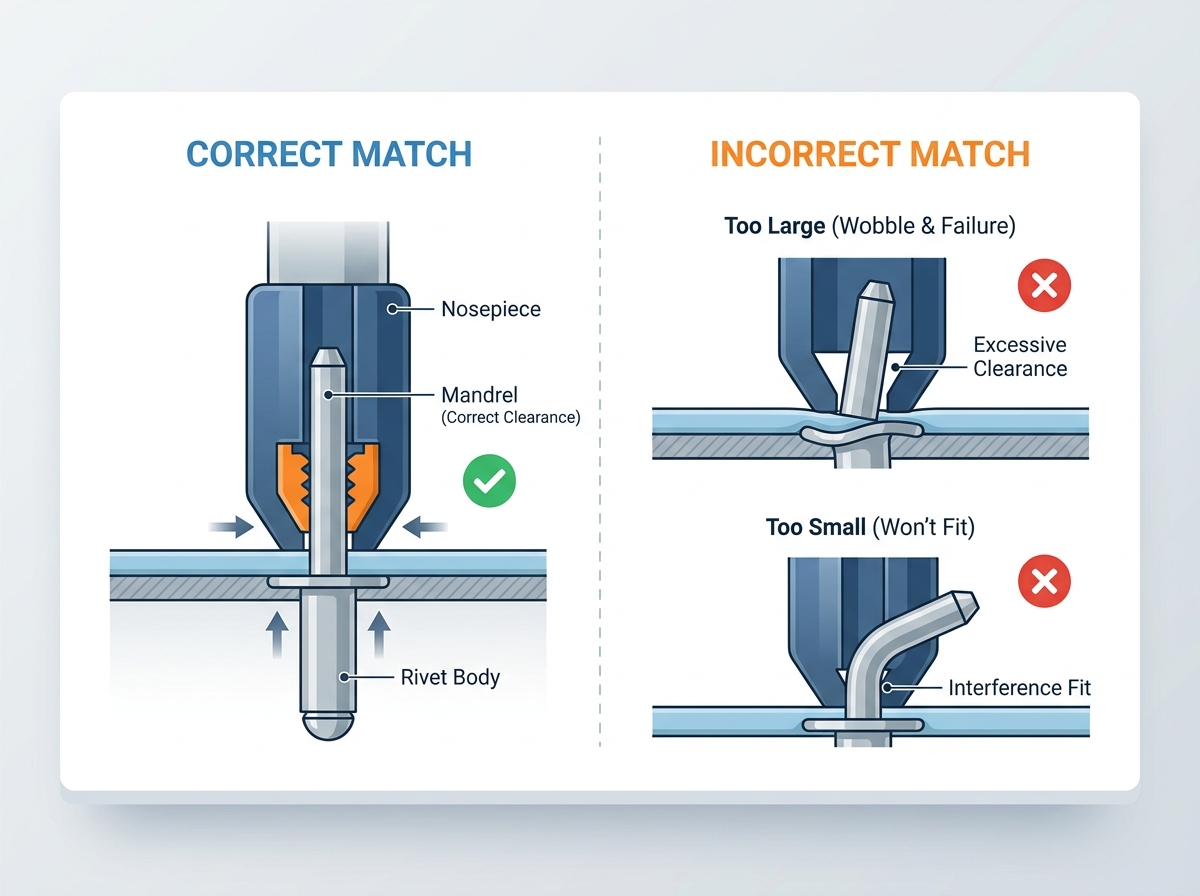
Choosing the exact hand riveter nosepiece size depends on standard sizing frameworks. Manufacturers label these front pieces based on the body diameter. However, these pieces actually grip the internal pin. The clearance must remain incredibly tight. You must match them perfectly to ensure proper jaw engagement.
Global manufacturing relies on standardized measurements. Imperial and metric sizes map closely to each other. This ensures cross-compatibility across different brands. You can easily switch between fractional and metric hardware. Never guess the dimensions. Always verify the specifications printed on your hardware packaging.
Different project sizes require specific hardware dimensions. Review these common applications.
3/32” (2.4 mm): Best for light-duty or precision tasks. Use these for delicate electronics or thin plastics.
1/8” (3.2 mm): Ideal for standard DIY and sheet metal. These serve as the most common everyday fasteners.
5/32” (4.0 mm): Used in automotive and heavier fabrication. They provide excellent shear strength for vehicle panels.
3/16” (4.8 mm): Required for heavy structural joints. You often need double-compound tools to snap these effectively.
1/4” (6.4 mm): Designed for extreme commercial applications. These usually push beyond the limits of standard manual tools.
You need a quick reference for your workspace. Review the chart below before starting any project. It helps you verify your equipment instantly.
Standard Rivet Sizing and Applications Chart
Fractional Size (Imperial) | Metric Equivalent | Typical Application Scenario |
|---|---|---|
3/32" | 2.4 mm | Precision electronics, thin acrylics, light hobby crafts |
1/8" | 3.2 mm | HVAC ductwork, standard sheet metal, gutter repair |
5/32" | 4.0 mm | Automotive body panels, heavy aluminum fabrication |
3/16" | 4.8 mm | Structural steel frames, trailer siding, load-bearing brackets |
1/4" | 6.4 mm | Industrial assembly, commercial marine construction |
Proper calibration prevents tool damage. Follow these precise steps for every project. A rushed setup leads directly to mechanical failure.
Always assess your material first. Are you using aluminum, steel, or stainless steel? Confirm the exact diameter specification printed on the box. Check the grip range carefully. Your materials must fall within this specified range. Measure your drilled holes using digital calipers. A tight hole prevents proper insertion.
You must change the front piece whenever you change hardware sizes. Follow this standardized procedure.
Step 1: Release handle tension completely. Open the tool fully to disengage the internal jaws.
Step 2: Use the included spanner wrench. Some modern tools feature knurled quick-release edges. Remove the current front piece carefully. Store it securely to prevent loss.
Step 3: Thread in the target size. Ensure it sits flush against the housing. It must remain firmly seated. Loose threads will strip entirely during high-tension pulls. This ruins the tool body permanently.
Knowing how to use a hand riveter properly guarantees success. Insert the pin fully into the chamber. Apply strict perpendicular pressure against your workpiece. Any angle deviation causes the pin to bend. Squeeze the handles firmly and steadily. You might need multiple pumps for longer pins. Continue squeezing until you hear a definitive pop. The joint is now secure.
Even experienced fabricators face mechanical issues. You must know how to resolve them safely.
Pins often get stuck mid-pull. This usually happens due to slight size mismatches. It also occurs when internal jaws lack proper lubrication. Dirt and metal shavings build up over time. This debris prevents the jaws from opening fully. A jammed tool halts all productivity immediately.
Never forcefully pry a stuck pin. You will damage the internal cylinder. Follow a safe disassembly procedure instead. First, remove the front piece using your wrench. Next, unscrew the outer housing barrel carefully. Extract the wedged pin using needle-nose pliers. Clean the internal jaws thoroughly. Apply a drop of light machine oil before reassembly. This prevents future sticking.
Hardware material dictates your pulling force. Stainless steel hardware demands immense pressure. This extra force accelerates tool wear. Jaws can dull surprisingly fast. You might experience slippage even if dimensions match perfectly. Aluminum hardware places much less stress on your equipment. Soft materials extend the lifespan of your internal components. Always inspect your jaws if slippage occurs repeatedly. Replace dull jaws immediately.
Basic tools fail under heavy workloads. Upgrading your equipment improves workflow efficiency dramatically. Look for superior lifecycle durability. A well-engineered tool pays for itself quickly.
Do not base your purchasing decision solely on initial price. Think about workflow efficiency and structural reliability. Constant jamming wastes valuable labor hours. Cheap components require frequent replacements. You need equipment built for continuous operation.
Compare these features when evaluating new equipment for your shop.
Nosepiece Storage & Changeability: Seek on-tool storage. You should never lose your extra pieces. Knurled edges allow quick swapping without extra wrenches.
Internal Jaw Construction: Look for three-piece Chromium-Molybdenum (Cr-Mo) steel jaws. They offer superior grip and exceptional longevity. Cheap two-piece carbon steel alternatives wear out quickly.
Leverage & Ergonomics: Single-hinge designs work well for light aluminum. However, double-compound hinges reduce hand fatigue significantly. They are absolutely mandatory for thick steel joints.
Mandrel Catch Systems: High-volume jobs generate a lot of sharp waste. A spent-pin collection bottle improves workspace safety. It keeps your floors completely clear of dangerous metal shards.
Investing in a professional hand riveter eliminates continuous maintenance headaches. You gain predictable performance on every single job.
Matching your tool dimensions to your hardware remains non-negotiable. Proper alignment guarantees incredibly strong joint integrity. It also significantly extends your tool's operational lifespan. A mismatch introduces unnecessary project risks. You compromise safety and aesthetics when you ignore exact tolerances.
Take time to audit your current supplies. Measure your hardware using accurate calipers. Check the health of your internal components regularly. Lubricate the jaw cylinders to ensure smooth operation. Upgrade your equipment for high-stress applications. A reliable tool transforms difficult fabrication into an easy, repeatable process. Step up your quality control standards today. Your future projects will benefit immensely from this basic mechanical discipline.
A: No. Using a larger size creates excessive clearance. The tool jaws will grip unevenly. This causes the internal pin to wobble. You risk permanent tool jamming. The hardware will also set improperly, leaving a structurally weak joint.
A: Use digital calipers to measure the outer tubular body diameter. Do not measure the internal pin. Compare this measurement against standard fractional or metric charts. Match this exact number to the stamped markings on your tool pieces.
A: This indicates internal tool wear. Your jaws are likely dull or clogged with debris. Lack of proper lubrication prevents adequate gripping force. Additionally, you might lack sufficient handle leverage if you are pulling hard stainless steel materials.
A: No. Grip range purely dictates the maximum material thickness you can join. You determine the correct tool piece strictly by the hardware body diameter. Length has no bearing on internal mechanical clearances.