- All
- Product Name
- Product Keyword
- Product Model
- Product Summary
- Product Description
- Multi Field Search

Views: 0 Author: Site Editor Publish Time: 2026-09-19 Origin: Site


While both tools verify 90-degree angles and feature graduated rulers, their application in real-world layouts is vastly different. Choosing the wrong square leads to compounding measurement errors or workflow inefficiencies. For professionals and serious DIYers, the choice isn't just about price. It is about the scale of your projects and the flexibility required. You might build structural framing for a new deck. Alternatively, you might cut precision hand joinery for custom furniture. These distinct tasks demand completely different layout strategies. This guide breaks down the functional differences, precision tolerances, and specific use cases for both instruments. We explore how scale affects accuracy and why moving parts introduce calibration risks. You will learn exactly how to evaluate which tool warrants a place in your toolbox or shop apron, ensuring your next cut is perfectly square.
Framing squares (often 24"x16") are fixed-angle, macro-layout tools essential for structural carpentry, stair stringers, and roof rafters.
Combination squares (typically 12" or 6") are adjustable, micro-layout tools designed for transferring measurements, marking 45-degree/90-degree angles, and setting machinery blades.
Precision standards dictate the purchase: cheap combination squares often fail strict tolerance tests, whereas fixed framing squares are inherently more robust but less versatile for fine detailing.
Most fabricators and woodworkers eventually need both, but your immediate project scope should dictate your first purchase.
A framing square consists of one continuous metal piece. Manufacturers typically stamp or laser-cut these tools from solid steel or lightweight aluminum. The tool features a longer "blade" (often called the body) and a shorter "tongue." These two sections meet at a precise 90-degree corner known as the "heel." The standard size measures 24 inches along the blade and 16 inches along the tongue.
High durability defines its primary success criterion. It contains absolutely no moving parts. You can rely on its fixed structure to maintain calibration even on rugged job sites. It bridges large distances effectively. You can easily span it across wide 2x4 framing members or broad sheet goods. Furthermore, the metal surface contains specialized rafter and stair layout tables. These stamped numbers allow builders to calculate complex roof pitches and stair rises directly in the field.
The combination square uses a complex, two-part anatomy. A machined head slides freely along a grooved steel rule. You lock this head securely in place using a threaded drawbolt. The head features both a 90-degree and a 45-degree referencing face. Most premium models also house a removable steel scribe and a small spirit level within the head assembly. Makers usually cast the head from iron or heavy aluminum for stability.
Repeatability serves as its core success metric. You can lock in a specific measurement once. Then, you can mark multiple boards identically without guessing. This functional design acts as a highly capable depth gauge. You can also use it as an accurate marking gauge. Woodworkers rely on it heavily as an essential machine setup tool for table saws and routers.
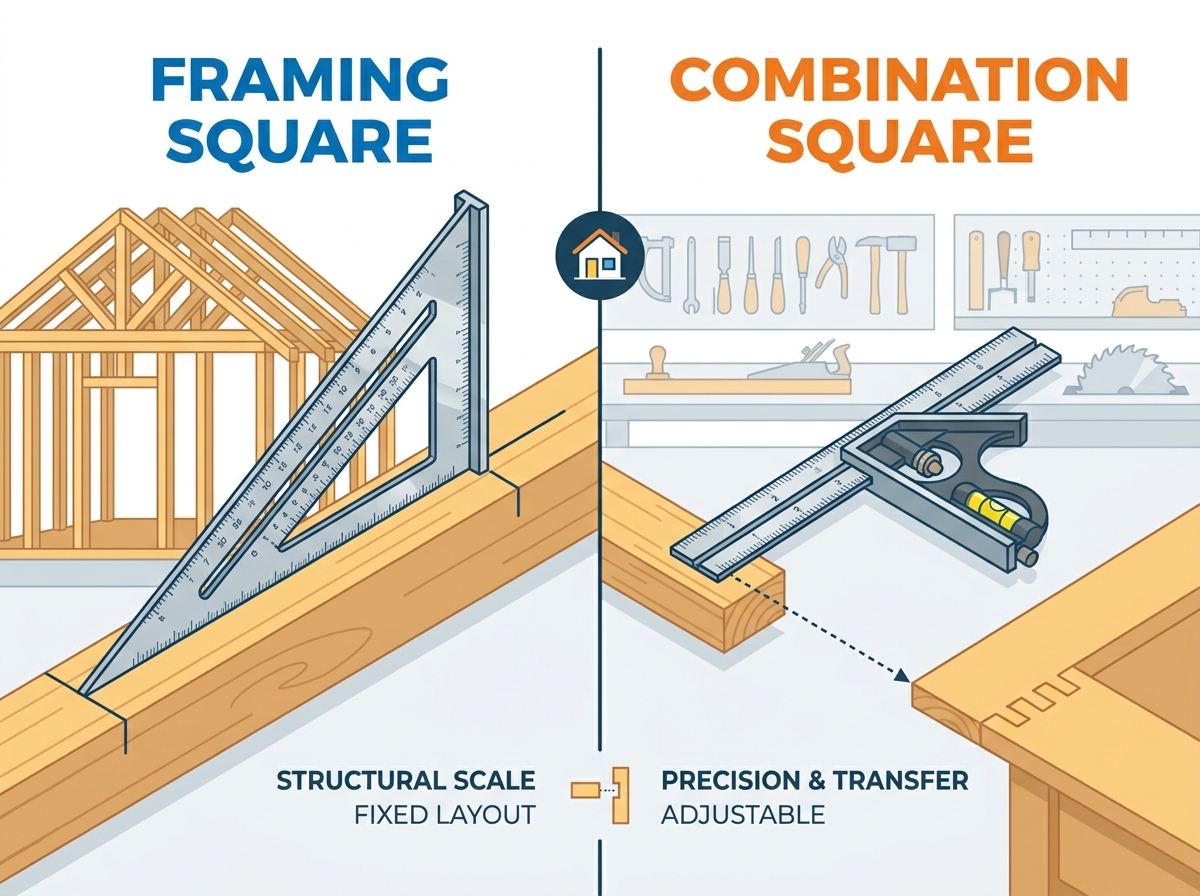
Combination squares excel at transferring a physical dimension. You take a measurement from one workpiece and move it to another workpiece instantly. You never need to read the numbers on the rule. This mechanical transfer eliminates transcription errors entirely. Your eyes do not deceive you during layout. You simply register the square against the new edge and mark your cut line.
Framing squares serve a completely different workflow. They prove superior for striking long, continuous lines. You often need to mark completely across broad surfaces like plywood sheets. A standard 12-inch combination square rule falls drastically short here. You must strike a long line in one smooth motion for accuracy. The large, fixed body of the carpenter's square makes this macro-layout process seamless.
Moving parts always introduce implementation risks. Combination squares rely heavily on the machined groove and the internal locking mechanism. Budget models often suffer from manufacturing "slop." The drawbolt fails to seat perfectly into the rule's groove. Consequently, the tool loses its true square over time. Dropping a cheap model onto a concrete floor often destroys its calibration permanently.
Both tools require baseline verification immediately upon purchase. You must perform a standard calibration test to verify their geometry. Precision woodworkers and machinists demand strict tolerances. They require tools measuring within at least .001 inches of true square over the blade's length.
Follow these numbered steps to test your tool's calibration upon unboxing:
Locate a factory-straight edge on a piece of MDF or jointed lumber.
Place the square firmly against the straight edge.
Draw a crisp, thin line along the blade using a marking knife or hard pencil.
Flip the tool's head exactly 180 degrees to face the opposite direction.
Align the blade back against the exact same line you just drew.
Draw a second line directly over the first mark.
Inspect the lines closely. Any visible divergence indicates the tool is out of square.
Many builders struggle daily with mixed measurement systems. Projects often demand switching between imperial lumber and metric hardware. When evaluating a framing square metric inch model, you must scrutinize the layout design. Verify the dual markings do not clutter the essential rafter tables. Poorly etched dual scales make field-reading incredibly difficult under harsh job site lighting.
For fine woodworking, a combination square metric inch setup provides immense value. We highly recommend dual-sided blades featuring metric measurements on one edge and imperial on the other. This configuration allows seamless transitions during assembly. You can measure domestic imperial stock instantly. Then, you can flip the tool to install imported metric cabinetry hinges without ever switching devices.
Not all premium tool manufacturers offer dual-scale rulers as standard equipment. Many classic American brands still default strictly to imperial graduations. Buyers often assume metric integration comes standard on high-end models. However, you may need to purchase aftermarket blades to achieve specific graduation preferences. Upgrading a cast-iron head with a third-party dual-scale rule ensures you meet both domestic and international project requirements smoothly.
To settle the framing square vs combination square debate for your own shop, review the specific trade requirements below. Each tool dominates entirely different sectors of fabrication.
Feature | Framing Square | Combination Square |
|---|---|---|
Primary Use | Structural carpentry, roofing, stairs | Joinery, machine setup, fine layout |
Adjustability | Fixed 90-degree angle | Sliding head, 90 and 45-degree faces |
Maximum Reach | Typically 24 inches | Typically 12 inches (up to 24" optional) |
Built-in Tools | Rafter tables, brace measure | Scribe, spirit level |
Measurement Transfer | Poor (requires reading numbers) | Excellent (physical locking transfer) |
You should reach for this macro-layout tool when tackling large, structural builds. Its fixed rigidity provides confidence when marking heavy materials.
Rough Carpentry: Ideal for deck building, framing walls, and laying out floor joists.
Stair Construction: Essential for laying out stair stringers using attachable stair gauges.
Roofing: Required for calculating and marking precise roof rafters using the stamped mathematical tables.
Large Assemblies: Perfect for checking the overall squareness of large cabinet boxes or door frames during the glue-up process.
Common Mistake: Do not use a framing square to set router bit depths. The large body is clumsy and risks scratching delicate router base plates.
You should rely on this adjustable tool when precision matters more than reach. Its ability to lock measurements transforms how you execute detailed work.
Fine Joinery: Crucial for furniture making, detailed cabinetry, and marking mortise and tenon joints.
Machine Setup: Flawless for setting the exact height of a table saw blade or the depth of a router bit.
Edge Scribing: Perfect for scribing parallel lines along the edge of a board by using the sliding head as a rigid fence.
Metalworking: Essential for machinist tasks requiring high-tolerance 45-degree and 90-degree quality checks.
We must acknowledge the ubiquitous 7-inch speed square. For many weekend DIYers, this compact rafter square bridges the gap between our two main tools. It provides an excellent lip for cross-cutting framing lumber quickly with a circular saw. However, it completely lacks the sliding dimensional transfer ability of the combination model. It also lacks the sheer length and bridging capacity of the large carpenter's square. It serves as a fantastic secondary tool, but it rarely replaces the primary layout instruments discussed here.
Your immediate project pipeline dictates your initial tool purchase. If you plan on building a backyard shed or framing partition walls, buy an aluminum framing square first. Aluminum heavily resists rust and weighs significantly less than steel models. Even a relatively inexpensive framing square will function perfectly for rough carpentry tasks.
If you plan on starting indoor woodworking or precision machine setup, alter your approach. Invest in a premium, high-tolerance combination square from respected brands like Starrett or PEC. Avoid cheap big-box store combination models entirely. A cheap adjustable tool acts as a hidden liability, introducing invisible errors into every joint you cut. By contrast, a basic fixed-angle framing square usually remains functional regardless of its price tag.
The debate between these two layout devices is solved simply by analyzing your specific workpiece size and your strict tolerance requirements. You cannot treat them as interchangeable substitutes. They possess unique structural architectures built for entirely different workflows.
As a final recommendation: frame houses and cut roof rafters with the framing square. Build custom furniture, transfer mortise dimensions, and set machinery heights with the combination square. Assess your immediate project blueprints today. Invest your initial budget into the tool that aligns perfectly with your required accuracy and the physical scale of your materials.
A: No. Its maximum standard length is usually only 12 inches. This short blade makes it highly unreliable for squaring large assemblies like wall frames. You cannot effectively check broad sheet goods or wide doors. A framing square spans much larger gaps, ensuring your macro-level structural layouts remain perfectly square.
A: You perform the standard reversal edge-test. First, place the head against a factory-straight edge. Draw a thin line along the blade. Next, flip the head 180 degrees and slide it back to your original mark. Draw a second line over the first. If the lines diverge at either end, the tool is out of square.
A: Manufacturers stamp specialized architectural math scales directly onto the metal faces. These include the Essex board measure, the brace measure, and comprehensive rafter tables. These scales solve traditional carpentry equations in the field. They allow builders to calculate board feet or roof pitches quickly, functioning completely differently from standard linear rulers.