- All
- Product Name
- Product Keyword
- Product Model
- Product Summary
- Product Description
- Multi Field Search

Views: 0 Author: Site Editor Publish Time: 2026-10-18 Origin: Site


Have you ever pulled a brand-new layout tool from its packaging and immediately noticed the metal tip wiggling back and forth? Many beginners assume this looseness indicates a cheap manufacturing defect. They might even reach for a pair of pliers or a hammer to strike the rivets flat.
However, this mechanical play is not a flaw. You are actually looking at an intentional, precision-engineered calibration feature. It remains completely essential for accurate layout and fabrication across multiple construction trades. If the tip did not slide, your lumber cuts would constantly miss the mark by a tiny fraction of an inch.
In this comprehensive guide, we will explore the fascinating mechanics behind true-zero measurement. You will discover exactly how to evaluate hook durability when shopping for new hand tools. We will also cover practical strategies to maintain measurement integrity on demanding job sites.
Intentional Design: Tape measure hook movement exactly equals the thickness of the metal hook itself to ensure absolute accuracy.
Dual-Function Accuracy: The slide accommodates both "inside" (pushed) and "outside" (pulled) measurements without requiring manual math adjustments.
Quality Indicators: High-end models utilize reinforced 3- or 4-rivet systems to prevent the hook track from widening over time.
Maintenance Risk: Dropping a tape measure or attempting to "tighten" the rivets will destroy the tool's true-zero calibration.
Every physical object occupies space in the real world. The metal tab at the end of your measuring blade is no exception to this rule. This small piece of steel has a distinct, measurable physical thickness. Manufacturers typically stamp these end components from steel measuring about 1/16th of an inch thick. You might see roughly 1.5mm of thickness on a metric tape measure. This tiny dimension creates a surprisingly significant engineering challenge for tool makers.
When you hook the blade over the edge of a board, you take an outside measurement. You rely entirely on tension to hold the tool in place. The reading must start exactly from the inside face of the metal tab. Otherwise, the hook's physical thickness would falsely add length to your final cut. Imagine cutting rafters where every millimeter matters. A static hook would ruin the entire roof pitch.
Conversely, pushing the blade directly into a corner requires an inside measurement. This action uses pure compression instead of tension. You press the tool flush against a wall, baseboard, or window frame. Here, the mathematical reading must begin from the outside face of the tab. If you install crown molding, a rigid tab would make your trim piece too long, causing the miter joints to buckle under pressure.
A reliable hand tool must automatically account for this constant discrepancy. Users cannot constantly add or subtract tiny fractions of an inch during fast-paced framing jobs. Human error would skyrocket under such tedious conditions. The tool design must handle both tension and compression scenarios seamlessly, adapting instantly to the user's physical push or pull motion.
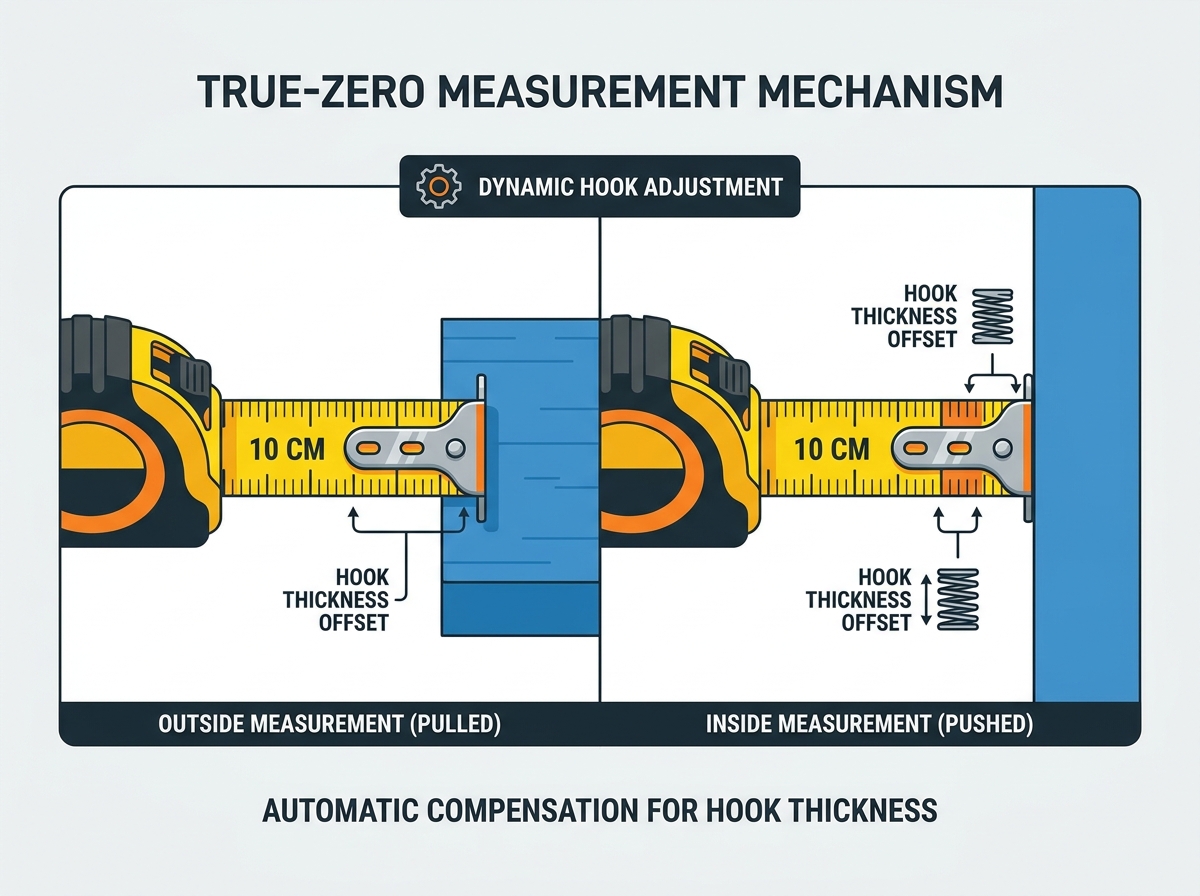
Engineers solved the inside and outside dilemma through a brilliant mechanical trick. They designed the rivets to sit in specifically milled oval slots. They deliberately avoided using standard fixed circular holes. This elongated track allows the metal tab to slide back and forth freely under different forces.
This precise mechanical play is known as tape measure hook movement. The travel distance exactly matches the thickness of the metal tab. It is not a random amount of wiggle room. It remains a highly calibrated distance designed in the factory.
When you pull the blade taut over a piece of plywood, the tab slides out. It stops forcefully at the very end of the oval slots. The resulting gap equals the metal's exact thickness. This shift perfectly aligns the true "zero" line with the actual edge of your material. You can then mark your cut line with absolute confidence, knowing the blade itself compensates for the steel's bulk.
When you push the blade flush against a solid surface, the tab slides inward. The blade essentially absorbs the metal thickness. The zero line shifts to the extreme outer tip of the tool. This guarantees perfectly accurate inside dimensions. Whether mapping out cabinet spacing or measuring rough window openings, compression readings remain mathematically sound.
Understanding this dynamic slide is crucial for any builder. It serves as essential baseline knowledge for anyone learning how to use a tape measure correctly. High-tolerance finishing, cabinetry installation, and custom millwork all depend heavily on this clever floating zero point. Forgetting how it works often leads to costly material waste.
Different construction jobs demand vastly different levels of durability and precision. You can often evaluate a tool's overall quality simply by examining the end components. Professional standards dictate specific requirements for heavy daily use compared to occasional household tasks.
Let's first examine rivet construction. The number of rivets directly impacts tool longevity and calibration stability.
Standard or DIY Models: These usually feature just two rivets. They carry a much higher risk of the slots stretching or warping over time. Light duty projects suit them fine, but they fail quickly under commercial framing stress.
Professional or Industrial Models: These step up to three or four rivets. These premium tools often include a reinforced metal backing plate. This plate stabilizes the sliding action and heavily prevents lateral twisting.
Next, consider hook variations through specific job-site lenses. Tool manufacturers design distinct tips for different trades. Selecting the wrong tip design introduces unnecessary frustration into your workflow.
Comparison of Specialized Hook Designs
Hook Design Type | Best Job-Site Application | Potential Precision Drawbacks |
|---|---|---|
Oversized / Multi-Catch | Rough framing and grabbing distant edges from multiple awkward angles. | Can feel incredibly clumsy for precise, delicate interior trim work. |
Magnetic Tip | Steel framing, commercial HVAC installation, and suspended ceiling grids. | Prone to picking up metal shavings that completely block the true-zero slide. |
Scribed / Notched | Grabbing a nail head securely to draw perfect arcs, circles, or radii. | Requires very careful alignment to avoid slipping off the pivot point during use. |
Finally, watch out for specific blade readability constraints. Bulky multi-catch designs or heavy magnetic tips offer great physical utility. However, they can severely obscure the first few centimeters of the painted blade. This visual blockage makes short-span evaluations frustrating. It becomes especially noticeable on a dual imperial and metric blade. The measurement markings sit very closely together in these zones, demanding clear visibility.
Even the highest quality layout tools suffer from severe job site abuse. Misunderstanding the floating zero feature leads to easily avoidable mistakes. Many experienced tradespeople still fall victim to basic calibration errors because they ignore basic maintenance.
Common Mistakes
The most common error is the tightening fallacy. Many weekend DIYers notice the looseness and mistakenly try to fix it. They grab a hammer and smash the rivets flat against the yellow blade. This action permanently locks the tab in place. Doing so completely destroys the true-zero calibration. You must never attempt to tighten a wobbly tab. Leave the rivets exactly as they arrived from the factory.
Impact damage presents another massive risk. Dropping your tool on a concrete floor often alters the critical 90-degree angle of the tip. A bent tab renders both inside and outside readings hopelessly inaccurate. The sliding function simply cannot compensate for a flared or crushed angle. Even a slight bend throws off your cuts by noticeable margins.
Debris build-up quietly ruins compression readings over time. Drywall dust, wet mud, or rust easily pack into the tiny oval rivet slots. This hidden grime hardens and prevents the tab from sliding inward fully. When this happens, your inside measurements will consistently read short. A perfectly good tool becomes useless simply because of dirt.
Best Practices for Verification Protocol
You should establish a routine verification protocol. You need to test your gear periodically to ensure absolute accuracy.
Find a trusted steel rule or a highly accurate machined calibration block.
Hook the end and take a 10-inch pull reading. Mark a fine pencil line on the material.
Push the end against the square block and take a 10-inch push reading.
Compare the two marks on your material. They should overlap perfectly.
If the marks diverge, your slide mechanism is compromised. You likely need to replace the tool entirely to restore professional accuracy to your work.
Choosing the right layout tool requires matching specific features to your daily trade. You do not need an expensive magnetic multi-catch tool for hanging simple picture frames in a living room. Conversely, a delicate layout tool will not survive a week on a commercial framing site.
For rough framing and heavy masonry, prioritize ultimate durability. Look for wide-standout blades that actively resist buckling over long aerial distances. Choose oversized, multi-directional hooks secured by heavy 4-rivet reinforcement. The tab play on these specific models will feel robust enough to survive harsh, repeated drops. Rough carpenters value reach and durability over microscopic precision.
For fine carpentry and custom millwork, prioritize absolute precision. You want standard, low-profile tabs offering incredibly smooth, unhindered true-zero travel. Avoid bulky magnetic tips at all costs. They easily collect stray screws or tiny metal filings. This physical interference ruins delicate compression measurements during high-end cabinet installations. Finish carpenters need pristine, easy-to-read blades.
When you visit the hardware store to buy new gear, follow these next-step actions:
Test the slide mechanism manually before buying. It should move back and forth smoothly. It must never exhibit sloppy lateral (side-to-side) twist.
Inspect the rivet backing plate closely. Look for sharp metal burrs or obvious manufacturing defects near the slots.
Standardize tool brands across your entire crew. Different manufacturers sometimes have very minor calibration discrepancies. Using identical models prevents compounding errors when two carpenters call out numbers to each other across a noisy room.
Mastering the concept of true-zero calibration instantly elevates the overall quality of your fabrication work. That tiny bit of mechanical travel transforms a static metal strip into a highly dynamic layout instrument. Without it, achieving tight wood joints and perfect cuts becomes incredibly frustrating, if not impossible.
Stop viewing the loose metal tip as an annoying manufacturing flaw. Instead, treat it exactly like the delicate precision component it truly is. A sliding tip guarantees your inside and outside dimensions align perfectly every single time.
Going forward, keep these practical action steps in mind. Protect your tools from hard impacts to strictly preserve the 90-degree tip angle. Regularly clean out drywall dust and mud from the sliding tracks using a stiff brush. Finally, always buy models featuring the appropriate rivet count and hook style for your specific daily job demands.
A: You should never attempt to repair or tighten it. Linear back-and-forth movement is intentionally designed for true-zero accuracy. However, if you notice severe lateral side-to-side wobble, the rivets have likely stretched permanently. This lateral play means the tool's calibration is dead, and you must replace it. Do not strike the rivets with a hammer.
A: The underlying engineering mechanics remain completely identical across all layout tools. However, the exact distance of the slide correlates directly to the physical millimeter thickness of that specific metal hook. Thicker hooks require slightly more slide distance to maintain perfect true-zero calibration during inside and outside readings.
A: Inaccurate inside readings are usually caused by unseen debris packed tightly into the rivet track. This dirt prevents full compression against the blade. Additionally, a slightly bent hook that no longer sits at a perfect 90-degree angle will heavily skew results. Always ensure you measure completely flush against the surface, never at an awkward angle.
A: You can easily verify this by comparing a 10-inch pull measurement against a 10-inch push measurement on a known static block. Mark both lines carefully on a flat surface. If the two marks do not align perfectly, your true-zero calibration is compromised. This failure often stems directly from a dropped or bent tip.